Please drop your computer mouse to the menu and you will see the effect :
This drop down menu is 100% using CSS, without javascript or other script. So that this drop down menu don't make your blog become slow down when in loading, faster loading and matc with much browser, i advice to you to using this dropdown menu at your blog.
How to make this drop down menu? there is ofcourse many way to do this, but i will show you 2 way to make this drop down menu :
# First way :
Step #1 :
Step #2
Note : for several template, this way is not good looking. So please find the other way.
Second way
Design of templates is very much and different, however I will take the example at minima template (original blogger template). Here is the steps :
A little clue :
At the above code, you will meet code like this :
This step is just for minima template, so with your blog template sometime same and sometime different.
Attention to the code <dt> and <dd>
The code begin with <dt>, there is the title of main menu.
The code begin with <dd>, there is the title of sub menu (drop menu).
You must alter the link with your own link, for example :
<dd><a href="../menu/zero_dollars.html" title="The zero dollar ads page"> zero dollars</a></dd>
I alter it become :
<dd><a href="http://template-unik.blogspot.com/2007/11/unique-template-r-21.html" title="free template R 1.2">UniQue Template R 1.2</a></dd>
Note :
This code is copyright of CSS play, so if you using this drop down menu at your blog please add a link back to CSSplay and retain any copyright comment in the stylesheet.
You can get the original code of this drop down menu at CSS play.
See you at my next post. Don't miss it brother.
This drop down menu is 100% using CSS, without javascript or other script. So that this drop down menu don't make your blog become slow down when in loading, faster loading and matc with much browser, i advice to you to using this dropdown menu at your blog.
How to make this drop down menu? there is ofcourse many way to do this, but i will show you 2 way to make this drop down menu :
# First way :
Step #1 :
- Login to blogger with your ID
- After entering the dasboard page , click Layout. Please saw the picture :
- Then click edit HTML tab. Please saw the picture :
- I suggest to you, beforehand to back up your template. Click the Download full template link. Please saw the picture :
- After you click Download full template link, then will emerge new window just to download. Click the Save button. Saw the picture :
- You could choose this data would in kept where and with what file name what, Afterwards ended with click of the Save button. Please saw the picture :
- Go to your template code and find this code : ]]></b:skin>
- Copy and paste following codes above of ]]></b:skin>
- Go to underside, the code searching looking like this :
  <b:section class='header' id='header' maxwidgets='1' showaddelement='no'>

<b:widget id='Header1' locked='true' title='your blog title (Header)' type='Header'/>

</b:section>
- Change the code printing with green colour, so that his code become be like this :
  <b:section class='header' id='header' maxwidgets='2' showaddelement='yes'>

<b:widget id='Header1' locked='false' title='your blog title (Header)' type='Header'/>

</b:section>
- Click
 . Await a few moments do shall your template have in saving.


Step #2
- Click at Page Elements tab. See the picture below :
- Click at Add a Page element which located above of the header element. See the picture following :
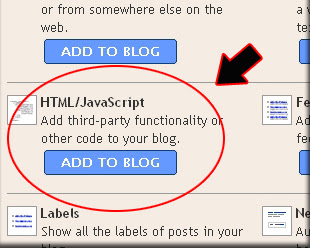
- After emerging pop up window , Click add to blog button for the things HTML/JavaScript. See the picture following :
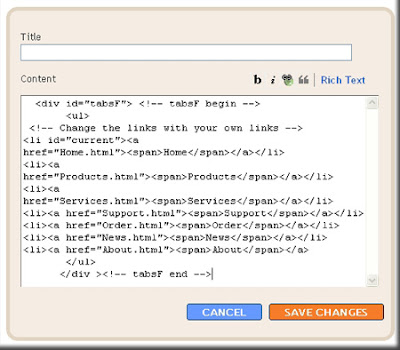
- Copy and paste the code below into available column ( don't forget to change the links with link property of your own) :
- Click

- Done. Please see the result.


Note : for several template, this way is not good looking. So please find the other way.
Second way
Design of templates is very much and different, however I will take the example at minima template (original blogger template). Here is the steps :
- Login to blogger with your ID
- After entering the dasboard page , click Layout. Please saw the picture :

- Then click edit HTML tab. Please saw the picture :

- I suggest to you, beforehand to back up your template. Click the Download full template link. Please saw the picture :

- After you click Download full template link, then will emerge new window just to download. Click the Save button. Saw the picture :
- Please mark the little box beside Expand Widget Templates. Wait for a moment.
- Go to your template code and find this code : ]]></b:skin>
- Copy and paste following codes above of ]]></b:skin>
- Go to underside, find this codes :
- Delete the above code and change with following code.
- Click

- Done. Please see the result.

 <div class='descriptionwrapper'>
<p class='description'><span><data:description/></span></p>
</div>
</b:if>
</b:includable>
</b:widget>
</b:section>
A little clue :
At the above code, you will meet code like this :
This step is just for minima template, so with your blog template sometime same and sometime different.
    <dt><a href="../menu/index.html">DEMOS</a></dt>

<dd><a href="../menu/zero_dollars.html" title="The zero dollar ads page">zero dollars</a></dd>
Attention to the code <dt> and <dd>
The code begin with <dt>, there is the title of main menu.
The code begin with <dd>, there is the title of sub menu (drop menu).
You must alter the link with your own link, for example :
<dd><a href="../menu/zero_dollars.html" title="The zero dollar ads page"> zero dollars</a></dd>
I alter it become :
<dd><a href="http://template-unik.blogspot.com/2007/11/unique-template-r-21.html" title="free template R 1.2">UniQue Template R 1.2</a></dd>
Note :
This code is copyright of CSS play, so if you using this drop down menu at your blog please add a link back to CSSplay and retain any copyright comment in the stylesheet.
You can get the original code of this drop down menu at CSS play.
See you at my next post. Don't miss it brother.
 ^ Scroll to Top
0 nhận xét:
Đăng nhận xét
♦ Mời bạn gửi Nhận xét của mình. Nếu không có tài khoản Blogger-Google, LiveJournal, WordPress, TypePad, AIM, OpenID, bạn vẫn có thể nhận xét bằng cách chọnComment as là Tên/URL hay Ẩn danh. Tuy nhiên bạn nên chọn Tên/URL với URL có thể để trống. Bạn vui lòng gõ tiếng Việt có dấu.
♦ Bấm vào Xem trước [Preview] bên dưới khung nhận xét nếu muốn xem trước comment đã viết, trước khi post [đăng]. Tương tự, bấm vào Đăng ký qua email [Subscribe by email] để đăng ký theo dõi nhận xét của bài này.
♦ Các bạn tự chịu trách nhiệm với Nhận xét của mình. Nhận xét để phản hồi, đánh giá, góp ý.... suy nghĩ của bạn. Thông qua Nhận xét hãy để cho mọi người biết Bạn là ai.
Xem ký tự của emoticons khỉ Yoyo tại đây.